
Review : Canon EOS 1300D
I have always loved taking photos and photography is something I am wanting to improve and develop my skills. When asked by Canon to try their Canon EOS 1300D with twin lens kit, I simply could not resist.
The Canon EOS 1300D is an entry level DLSR camera and is a great starter kit with the twin lens kit for anyone wanting to improve their photography. The camera would suit students, families or those wanting to take the next step with photography, just as I have done. The main body will last throughout a photography journey and can be used with suitable lenses from the Canon range, even the ones in the thousands of pounds.
The specs are fantastic:
DIGIC 4+ processor
18 Mega Pixel
ISO - AUTO, 100 - 6400, Extendable to 12800
Optical Viewfinder and 3” / 75 mm TFT LCD screen
Shoots RAW and jpg
Full HD 1920 x 1080p (23.97 / 25 / 29.97 fps) with sound video
Wifi and NFC
This is by far the largest camera I have owned, yet it felt a good size when held and a decent weight. I much prefer the 18-55 mm DC III Lens as I feel I can keep the camera steady with this lens. The 75-300 mm DC II Lens is much bigger and I need more practise to keep the camera steady with this lens in place. I will get there it will just take time and is no means a criticism of the camera, more my lack of ability.
With the exception of movie, there are 3 main 'zones' to the Canon EOS 1300D
Creative Zone:
I am still not confident enough with my photography to show my photos taken out of auto yet, I keep having a play but am not happy with the results. In this zone you control one or more of Shutter, Aperture or Exposure.

Basic Zone
There are three elements in the Basic Zone:
1. Intelligent Auto
2. Flash off
3. Creative Auto
Intelligent Auto is just that, the camera takes control of all settings and the only option to change is if the count down timer is on or not.

Flash off is great for those times when you do not want the flash to fire, for example at an aquarium or if taking photos of babies. I do not like to use flash when photographing Little Man as he often ends up startled by the flash.

Creative Auto, this is my favourite mode in the Basic Zone. It is similar to intelligent Auto but you have the option to turn the flash off. You can also choose the amount of blur for the background of the image. I find this the most useful out of the three.


To make changes to the flash or to set the self timer, these are accessed via the Q button. Pressing the camera button next to the view finder also switches the image from view finder to Live view [screen] so you can see the image if you were to use the timer or countdown function. It is also the record button when in movie mode, as you can only record movies when using the screen.

In all modes in basic Zone and Image zone you can also apply a filter before you take the image. This is also accessed via the Q menu. These include:
Soft
Warm
Intense
Monochrome


Brighter
Darker
Cool
Vivid

You can also apply filters after you have taken the photo by accessing creative filters in the blue menu. You can apply filter upon filter to create really unique shots, and the image is saved as a separate file so you do not loose the original image. I really like this as it meant I could play around with an image afterwards and not worry about making changes to it.


Image Zone
With the exception of Night portrait and food the Q menu brings you the same options as in basic settings and an additional Light/scene function i.e. Sunset, shade, cloudy, Florescent light. The impact that each of these will have on the image can be seen before the image is taken. Again the camera is doing the hard work and taking control over other settings.
I have found it worth playing with the modes as sometimes portrait mode does not give you the best portrait but landscape does instead, as an example. It depends on the final image you are wanting to create. Also as some modes you cannot alter the flash it may mean that this mode is unsuitable for the environment you are shooting in.
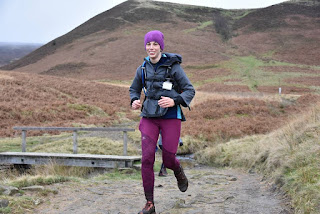
Sports
I used sports mode to capture this of the girls. I love how clear the girls are in this image even though they were running quite fast at the time.
I used sports mode to capture this of the girls. I love how clear the girls are in this image even though they were running quite fast at the time.

Landscape
The beautiful scenery has been captured perfectly and I am impressed with the detail even in the distance

Macro
I love my macro photography and it is not often you find a camera in auto macro mode that can capture this much detail. I can only imagine how great it would be to add a Macro lens, which I think will be my next purchase.

Portrait
I wanted to keep the background blurred so used the portrait mode for this image, again I love how clean and sharp the girls are in it.

Creative Auto with Self timer
I had not installed the app on my phone at this point, otherwise I would have used Wifi and my phone to control this shot. Instead I used the countdown function. It was a little tricky as there is no visual representation for you to see when you are in the photo of when the photo will take. I almost managed to get them looking!

Food
I have not yet experimented with this mode, mainly because I struggle to get a photo of food right, however I will be playing around more with this so keep an eye on my Instagram feed.
I have not yet experimented with this mode, mainly because I struggle to get a photo of food right, however I will be playing around more with this so keep an eye on my Instagram feed.
Night Portrait
I have not used this mode as it recommends you use a tripod for stability and I do not own a tripod!
I have not used this mode as it recommends you use a tripod for stability and I do not own a tripod!
I wanted to share a tip and that is to always check the focus switch on the lens. I had a moment where I could not work out when semi pressing the button to take a photo was no longer focusing the image, it was then I realised the switch on the lens. By switching to MF you need to use the manual focus, or focal ring to focus the image. AF is automatic focus!

WiFi
The WiFi function [and NFC] is a must for all modern cameras in my opinion. It allows you to control the camera via your smart phone or tablet, which means you do not need a separate shutter release button to take photos of yourself. You can also remotely control the camera so you could place it in the garden to wait for a particular animal to turn up and then use your phone to take the picture. The WiFi function also allows you to transfer an image straight from the camera to the app. From here they can be shared straight to social media.
I have had the camera now for just over a week and have loved playing with it to find out what each element does. I have been impressed with the quality of the images so far and love how clear they are. The camera does have a few niggles for me, the first is that you cannot turn off the flash in all modes. It will just take me some time to get used to this and I can understand the reasoning behind doing so. The second is it does have a loud shutter release. Taking a photo of a sleeping baby would perhaps wake the baby, I will not even attempt it with Little Man just in case, the same with wildlife. I have made the dog jump and run away because he was not expecting the noise. With that said I am still enjoying the camera and look forward to taking more photos with it and learning more about the different modes and functions.
“I am a member of the Mumsnet Bloggers Panel, a group of parent bloggers who have volunteered to review products, services, events and brands for Mumsnet. I have not paid for the product or to attend an event. I have editorial control and retain full editorial integrity.”


.jpg "Janome Sewing Machine")


0 comments
This day I love comments and I read everyone