• Home
  • About
  • Travel
  • Fitness
  • Photography
    • Birth
    • The Story of You
  • Disclosure and Privacy
facebook twitter instagram pinterest bloglovin Email

This day I love.......

Gel-A-Peel is a patent pending innovative gel which allows kids to be crafty and creative. It is incredibly simple to use, squeeze the tube to release the gel, either draw freehand or around a template to create a design, leave to dry and then peel your design. The designs are then set and are ready to go.

Gel-A-Peel challenged us to get crafty this Christmas. Using one of their Mega Rainbow kit what could we design for Christmas. 


The girls decided to make some Christmas crackers. Using some templates we had they got to work with their Gel-A-Peel to make them more colourful!


The hardest part was choosing which colour to use. The Gel-A-Peel tubes have a small lid inside the main tube which needs to be removed and then a nozzle attached. There are three different types of nozzles, small hole, star and scrape. Each produce different patterns and the girls liked experimenting with each one. 


Once the crackers were coloured in we left them to dry overnight. The Gel from the Gel-A-Peel hardens, although it still has a soft texture to it, and made for some very colourful decorations. As you can peel the gel away from the surface, although it takes some peeling from clothes and fabric so be a little careful, we decided to then draw round some templates to make some decorations too. 

The naughty elves might have also got hold of the Gel-A-Peel because we also have some drawings appear of the patio doors. Not to worry the gel peels straight off and looks rather festive too [although they might not be the best artists!]


We would love to know what you create with your Gel-A-Peel!

Thanks to Gel-A-Peel for challenging us this Christmas and sending us the kit to get creative.
Share
Tweet
Pin
Share
No comments
My youngest daughter loves Squishy and collectable characters, she also loves to be creative. When I heard about the smooshins surprise maker kit I immediately thought it would be something she would want to try. The smooshins surprise maker kit provides over 10,000 different combinations and you can purchase additional colour pouches and moulds so the surprise maker can be used again and again.

Whilst the instructions are really clear and easy to follow I am rather grateful that the Surprise maker kit comes with a practise colour pouch. Our first 2 attempts were unsuccessful, which is why in the video the kids are wearing different clothes! On one of our attempts we did not mix the colour enough. You have 90 seconds to mix all the colour together. In another attempt we took too long to squeeze the colour into the maker, you only have 30 seconds to do so. 


The maker also lights up different colours in an attempt to guide you through the process.


We were very much third time lucky.

It is really important to fully pop the colour pouch and then mix it within the allocated time, followed by squeezing the colour before it hardens. A top tip would be to make full use of the practise pouch that comes with the kit, as it really does give you an idea of what to do. We also found that the longer you leave in the mould the better the product is. We left in the maker for 4 hours and then left it in the mould overnight. 

The girls talk through step by step how to make a Smooshin here


Now we know what to do and have had practise runs it is actually a lot quicker and simpler than the first time we did it. The girls really enjoy making the Smooshins and the extra surprise of not knowing what the character will be like really helps add to the magic. It is also great that additional moulds and colour pouches can be purchased so that you can continue to use the surprise maker kit once the supplied materials have been used up.

Smooshins are a really cute collectable toy, and the added mystery of not knowing what they will look like adds a whole element of fun to the creating process. My girls aged 8 and 6 really enjoyed making them and could do so with very minimal help. They are wanting to make some more so I am going to have to buy some more colour pouches for them.

The Smooshins maker was sent for review, all words are my own opinion. 

Share
Tweet
Pin
Share
No comments
Both girls love to get creative and either make things, or draw.  They love to try new things and I love to watch them use their imagination.  My eldest daughter has her SATS this year and so whilst helping her with a reading comprehension, I gave my youngest a mirror and a packet of Chalkola pens.

I simply gave her the instructions that she could do whatever she wanted on the mirror.  To which she looked rather confused.  The thrill of drawing on something that wasn't paper.  It wasn't long before she got stuck in and started getting creative.


Chalkola are liquid chalk markers.  They come in a variety of sizes and some fantastic vibrant colours.  To begin with you need to give them a little shake to get the chalk flowing, but from then on you use them just as you would a normal pen.  The Markers are best used on Non Porous Surfaces such as Chalkboards, Whiteboards, Glass, Plastic, Windows.  Porus surfaces have small holes which absorb the liquid chalk and it can be difficult to erase.  I found it best just to test a small area first to make sure.

My eldest daughter soon wanted to join in and so as soon as she had finished we set about completing her maths homework on the mirror!


After taking photos of her work to stick in her homework book, she too then got very creative and made a cat in the hat mirror!


The girls found Chalkola really easy to use.  The chalk pens were as easy to hold as a normal pen, and they loved that they could draw on a surface other than paper.  I find it a great way to keep them entertained too, as they love to draw on the patio doors!

Chalkola have offered a 15% discount code if you wish to have as much fun as us with the code 15OFFSTR and I am even pleased to offer one reader the chance to win a Pack of 21 Markers.  Giveaway ends on 6th May 2017 midnight GMT and full terms are on the widget.  Good Luck. 

Chalkola
Share
Tweet
Pin
Share
No comments
A restless night with Little Man after running the night run the night before gave me very little energy on Sunday morning.  I settled for a craft morning with the girls before lunch and it gave us the perfect opportunity to build tiaras with our Frozen tiara kit from Clementoni.  

Girls making frozen tiara kit

The kit contained 2 tiaras and the majority of items you needed to make each.  It was missing glue, which luckily we had, and elasticated thread, which we did not have so we were unable to finish one of the tiaras. 

Sticking jewels on tiaras

The girls got creative with their tiaras, using glitter, beads and sticker gems.  I loved watching them use their imaginations to make up their own designs. 


Whilst I need to buy some elasticated thread to finish my eldest tiara, my youngest is complete and she took great pride in wearing it to show off her Frozen design. 


A lovely way to spend a Sunday morning, and just what I needed after a sleepless night!

Thank you to Clementoni for sending the Frozen tiara Kit, all words are my own opinion.

This day I love a crafty Sunday. 
Share
Tweet
Pin
Share
No comments
I have had a busy but very fun couple of days.  Whilst the girls have been at school I have been getting rather creative and doing a few Halloween crafts!

Last year the girls loved trick or treating.  Our neighbours really seem to enjoy it too and most of the houses in our street are decorated, this in turn means the girls come away with quite a few treats.  Last year they filled their bags and started using their witches hats to carry more treats.  Unable to find any larger treat bags I decided to make them one.

I took a paper bag and hung it on the washing line with a clothes peg.  Then using black spray paint I carefully spray painted the bag.  As it was hanging on the washing line I could get all the way round the bag to paint all sides, and it dried well blowing in the breeze!

Once dried I drew a ghost and stuck this to the bag to act as a template,  Using the glow in the dark paint I sprayed the ghost shape onto the bag.  The result is a rather spooky Halloween trick or treat bag [the picture is a bit rubbish but my camera and phone could not pick up on the detail in the dark.


My girls seem to really love conker hunting at the minute, and I love that it gives us an excuse to spend more time outdoors.  However it does seem to mean that I have a house full of conkers.  We do put some of them back outside in our garden for the squirrels. 


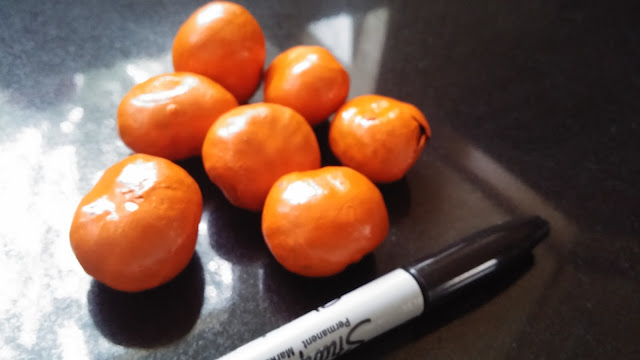
I took some of the very many conkers that the girls have and sprayed them orange.  


The great thing about conkers is that they have a similar shape to pumpkins and when sprayed orange look like mini pumpkins.  Giving them a lighter spray means some of the conker brown still comes through as if they are stripped, and it gives it a more natural look to a real pumpkin.  Of course carving them would be rather tricky so I took my trusty permanent marker pen........


...... and drew some scary pumpkin faces on them!


When the girls came home from school they even drew a few scary faces on the mini pumpkins!  

I am thinking of saving a few for Christmas and perhaps painting them white for snowmen?

All paints mentioned were provided free of charge, words are my own opinion. 

Share
Tweet
Pin
Share
No comments
I have decided that this school holiday we would try and make the most of events happening near to us and spend some time at home as well.  Our local library is hosting a serious of Roald Dahl inspired craft activities once a week and as we were up early this morning we decided to pop along.

Today the theme was Fantastic Mr Fox and the girls were making masks.  The girls were shown an example of a finished mask and then left to use their imagination to create their own.


The girls were really pleased with their masks and pretended to be Foxes around the library. 


This day I love Fantastic Mr Fox
Share
Tweet
Pin
Share
No comments
The girls have been busy over the past few days making a present for their Grandads for father's day.  They both love crafting and getting creative and they both asked to make something.  Rather than the usual we decided to try something new, and a new craft they had not done before. 

The girls had seen a découpage project and had been asking for a while to have a go, this therefore seemed the perfect opportunity.  We gathered together all the items we would need, and the girls decided to make a letter for each of their Grandads and a photo frame


The process seemed really easy, glue, stick and when finished varnish.  The girls loved that they could use all sorts of different paper and let their imaginations run free.


My youngest got really creative with hers and seemed to take it to a whole new level


Both girls had a lot of fun creating their gifts and have made something truly unique and personal which I am sure Grandad will love!


The girls would like to say thank you to Hobbycraft for sending over the supplies and helping them to create a unique gift for Father's day.


This day I love getting ready for Father's Day
Share
Tweet
Pin
Share
No comments
The 14th March is  National Children's Craft Day.  The girls and I love to be creative and do craft activities together.  Taking part in crafts is a great way for us to use our imaginations and to spend time together.

Whilst we often just use our imagination to build things sometimes it can be really great to have kit to make.  The Natural History museum have a great selection of craft kits available ready for National Children's craft day.  

One of these kits is to build a butterfly mobile.  The kit contains everything you need, except scissors, and even includes a book to tell you all about the different species of butterflies.


My youngest began sticking the butterflies onto the ribbons to make the mobile


The girls were really good and shared the glue with each other.  My eldest preferred the plain butterflies and my youngest the pattern ones. 


It was really easy for both girls to do, but they took their time and really enjoyed making the butterfly mobile


The kit was simple to follow and gave the girls a lot of fun to make the mobile.  We could even use the handy guide to talk about the different butterflies on our mobile.


We will be ordering another kit from the Natural History museum for National Children's Craft day, they are a lot of fun and a great way to encourage imagination and creativity in children.

Thanks to the Natural History museum for sending the kit to us in exchange for review.  All words are my own opinion 
Share
Tweet
Pin
Share
No comments
My husband and I both have degrees in engineering, which means we both have a love and passion for maths and science.  Our minds seem to work in a logical fashion and we enjoy the challenge that numbers bring.  Our eldest daughter seems to also have an analytical mind and can spot patterns and sequences very quickly. 

When I received an email from Numberbundle I actually got incredibly excited.  Numberbundle are mathematical activity boxes which support both the Early years foundations stage and National Curriculum for children 3 -7.  The boxes cost £21 for a single box or can be a monthly subscription and cost £16.99 per month.  Each month the boxes take on a different topic from the national curriculum and cover a range of activities.  The activities include cookery, arts, crafts, games, puzzles, cross stitch, outdoor play, science and story.  I was very keen to see the boxes and see what the girls thought of them

Numberbundle box

First impressions on the boxes were great, both girls wanted to open the boxes up straight away and have a look inside.  Inside the boxes there is a card explaining the activities and the topic they are supporting.  Then cards for each of the activities, including full instructions and finally some of the materials you may need for each activity.  Although not all materials are included those that are not are easy to source, such as glue, water and newspaper.

Inside Numberbundle box

The girls had different boxes each suited to their specific age group, my youngest is Early years and my eldest is Year 1.  Inside my youngest Numberbundle box the topic was big and small, the topic for my eldest was money.  The girls looked through the enclosed activities and we picked one to do.

Selecting numberbundle activity

The great thing about the cards is that they not only contain full, clear instructions of the activity and how to do it, but they also contain discussion points.  This gives me as a parent an idea of the topic that is taught at school and ways in which I can incorporate this into daily life.  For the girls, they did not realise they were doing maths based activities, and instead simply had fun with the activities they had chosen.

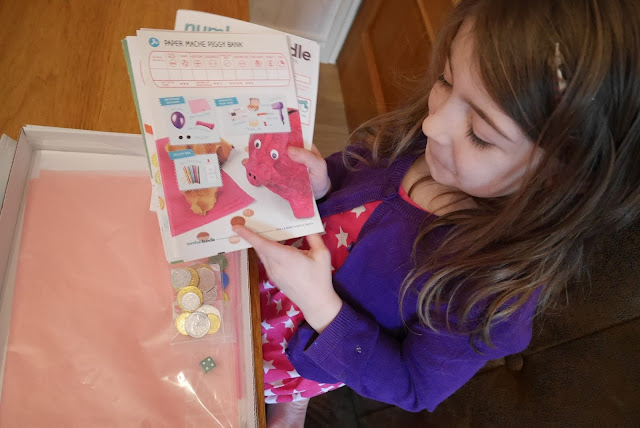
My eldest wanted to make a papermache money box pig.  We used this to discuss tearing paper into halves and quarters, used the legs to count and work out how many legs we would need.  Calculate how many more money boxes we could make with the material we had left and calculate the fraction of water to glue for our mixture. 

Making pig

My youngest chose to do the playdough mat activity.  We had already made some playdough, but there was a recipe to make playdough included.  We used the playdough mats to make ears, tails and wings and discuss which animal had the bigger ears, the elephant or the mouse?  Did my youngest have bigger or smaller ears?  Whilst she could do some of the activity independently, making the ears for example, we discussed bigger and smaller together as she played.

which is bigger?

I really love how Numberbundle encourages discussion around each activity in a fun way, so the girls did not feel like they were learning but instead just playing.  It has helped me as a parent gain a better understanding of the activities the girls do at school, which means I can support their learning at home.  Numberbundle are also a great way to engage with your children as they do each activity so you can do things together, as well as supporting independent learning also.

I am giving away a Numberbundle box worth £21 to one reader, giveaway is via the Gleam widget below and ends on the 12th March 2016 at midnight GMT. Full terms and conditions are on the widget.

Numberbundle
Share
Tweet
Pin
Share
1 comments
Early this year I had a very exciting email land in my inbox, an invite to a festive mid week break at Bluestone Wales.  To say I was excited would be an understatement, a chance to go to Bluestone at Christmas was an opportunity I could not tun down.  The girls have been desperate to go to the Wales holiday again and Christmas was sure to be magical.

After a 7 hour journey in the rain we arrived at Bluestone.  Our lodge was of a different style to the previous visit  and was spread over two floors. 


The bedrooms were clean and modern and the girls wasted no time in choosing their room.  Grandma settled them into bed with a bed time story


Thing 3 and I were a little tired after the drive and we made the most of our modern double bedroom and went straight to bed.


The next morning it became clear the main advantage of having a lodge with the living area upstairs.  The views over Bluestone were fantastic, even if the weather was miserable.


The weather has never stopped us before, and we fully believe in free range fun regardless of the weather.  We got ourselves kitted up and headed to Blue lagoon.  


As with our last visit the girls would have quite happily spent all day in the swimming pool.  The water is like stepping into a nice bath, and even when you step out you feel warm.  The changing areas were kept clean and tidy and we saw several members of staff cleaning as we were there.  The pool was busier than last time but we still felt able to relax and have fun.

After swimming it was time for a hot drink before our festive fun began.  The girls remembered the village tea shop and were really surprised to see that Babycinos were now on the menu.  


This was the first in a new discovery at Bluestone since our last visit.  Our festive fun was to begin with the Bluestone Pantomime, Cinderella.  


The Pantomime took place in the Village Hall.  This was a new building to us and situated behind the spa.  The Oak beams and white walls gave it a real modern feel and was just the right size for the pantomime.  We took our seats and waited for the show to start.  

The girls were enthralled.  Cheering and booing and joining in with the chants.  A real proper pantomime, just as I remembered from my childhood.  It was full of laughs and traditional style jokes, just what was needed for a pantomime.  My Mum and I absolutely loved the ugly sisters, two very talented actors and I would highly recommend seeing the production just for them.  Although if you ask the girls they really loved Cinderella and Buttons.


Thing 3 was craving a pizza after the Pantomime but unfortunately the pizza takeaway was no longer available.  We decided therefore to visit The Oak Tree, which was our favourite from the previous visit.  Luckily for Thing 3 they did Pizza and even had a lemon desert which catered for another of Thing 3 cravings.  


The girls felt very festive sitting by the beautiful tree in the restaurant and it was certainly beginning to feel a lot like Christmas.


On our previous stay we had a beautiful walk in wet room and in this lodge we had both a shower and a bath.  The girls could not wait to get into the bath and have a good splash around.  The bathroom was clean and modern and had plenty of room for the girls.


I turned 28weeks pregnant with Thing 3 and so had to take a bump shot.  I do feel like I have stuffed a bowling ball up my t shirt


Our plan was to return to Camp Smokey for lunch as it was one of our favourite places, however it was closed for the winter.  Instead we headed over to the activity centre for some indoor play and some fun out of the rain.

The girls loved that they were greeted by reindeer and trees, it certainly felt very festive.


The girls did not know but we were actually here for a secret mission.  An elf mission to be precise.  The girls were about to enter the Kingdom of the elves and were given maps outlining their secret mission.  Our elf guide explained what we had to do to graduate as elves and gave each of the girls a uniform, before shrinking us so we could fit through the key hole.


It was time for our mission to begin.  Each room had different tasks that an elf must undertake from ensuring pets stay asleep, to helping children have magical dreams.  The favourite room of all was the chocolate room.  In here the girls had to make the chocolate for the advent calendar.


Whilst the girls ensured the chocolates were up to scratch, Mum and I posed for an Elfie Selfie.


The girls completed all of their missions and graduated from Elf school.  As events go the Elf Academy was by far one of my favourite.  It was pure interactive festive fun and if we could we would have done it again.  All of the Elves were fantastic and interacted with all of the children.  This interaction made it what it was, as it simply flowed and was fun rather than scripted.  Crackers the elf needs a special mention, pure comical genius!


After visiting the Kingdom of the Elves the girls were in a real festive mood.  Neither of them wanted to take off their elf uniforms and both asked to take them to show and tell the following week.  

Perhaps the only way to celebrate becoming Elves is with Peter Pan and Jinglebelle.


Jinglebelle is a fun interactive dinner show which is a very memorable way to spend an evening.  The girls had to help Peter Pan find his shadow, who did keep running away during our Christmas dinner.  There were jokes and activities to do to help Peter Pan and Jinglebelle.  Certainly a fun evening and a perfect way to celebrate their success at elf academy.


Oh and I forgot to add the festive tunes which made it perfect for dancing around the Christmas tree.


Our last full day at Bluestone was fast upon us.  It had been a truly festive week so far and the festive fun continued.  After a morning swimming, as this was the girls request on their final day, we headed for a festive Hot chocolate before our afternoon activities.  


The girls love crafting and making things at home and with all the excitement of Christmas we thought it would be great to have an hour crafting with the Bluestone team.  It gave the girls chance to refresh after a busy few days and they actually got really creative.  We made Christmas cards, present boxes, baubles for the tree and character spoons.  Rather productive for an hour crafting!


They were both starting to get very excited and also seemed to have picked up the Bluestone Christmas song which they have been singing non stop on repeat.  


I had lined up a special treat for the girls after crafting.  They were headed to the spa for an hour with Grandma to have their nails and hair done, whilst I went for a relaxing pregnancy massage.


Thing 3 seemed very happy with the massage.  I met the girls downstairs afterwards, we finished almost at the same time, and they had lovely sparkly nails and feathers in their hair.  Both ready for the Festive season, pampered and relaxed.

There was only one way to end our day and that was of course with a Christmas dinner


After dinner we were all transformed back into elves, which lead the girls to wonder what was happening next.


For our final evening the girls got to meet Father Christmas himself.  They even got to listen as he told them a wonderful Christmas story featuring Ruddie the reindeer.  


Our time at Bluestone was almost to an end.  The girls spotted the cast of Cinderella and my Mum attempted to take a photo of us all together.


After which it was time to say goodbye, but not without watching the spectacular festive light show in the village.  


Our time spent at Bluestone Wales really got us all into the festive spirit and was the perfect way to start the holiday season.  I can only imagine how amazing Bluestone is over Christmas.


Thank you Bluestone for inviting us to stay.  Our accommodation was provided free of charge but we paid for all activities. 

Share
Tweet
Pin
Share
1 comments
Older Posts

About me

About Me

Welcome to This Day I love.

My name is Leyla, also known as Mum to my 3 humans and dog Mum to J. I have a passion for the outdoors and love to run. I can often be found off road exploring the trails and fells and covering distances all the way up to 50 miles. As a family we love travelling and discovering new adventures, as I try and run around the world!

Follow Us

  • facebook
  • twitter
  • instagram
  • Google+
  • pinterest
  • youtube

Popular

(c) thisdayilove . Powered by Blogger.

Brands


Ambassador Badge Tonka Orchard toys Hotter shoes Forests Nuby BritMums - Blogging with Integrity

Created with by ThemeXpose